Wednesday, May 31, 2017

Birth Annoucement Towels

I came across these lovely embroidered baby blankets on my Pinterest board with details of the new born baby embroidered in a corner. Inspired by these ideas, I decided to try them out on a towel for a friend who had a new arrival in the family.

The biggest time consuming challenge was designing the entire logo on the machine, I know I could have done it much more quickly if I owned the software to create projects on my computer and then simply transferring them to the sewing machine. Maybe in the future, if I find myself being limited, I will consider buying it. For now, it was time to explore the limits of my machine and my imagination and spending money when really needed.

After a free Craftsy class that demonstrated the basics of embroidering on towels I was ready to go to try out my first project.

Here is picture of my first completed project that I made for a friend in Michigan. He was very happy to receive the gift in the mail, more so because he was not expecting it at all, I love being the cause of pleasant surprises (sometimes!).


Since then I have tried out different threads and placements of the details and added monograms on the entire set. These have been given out as gifts at baby showers for friends and colleagues at work.


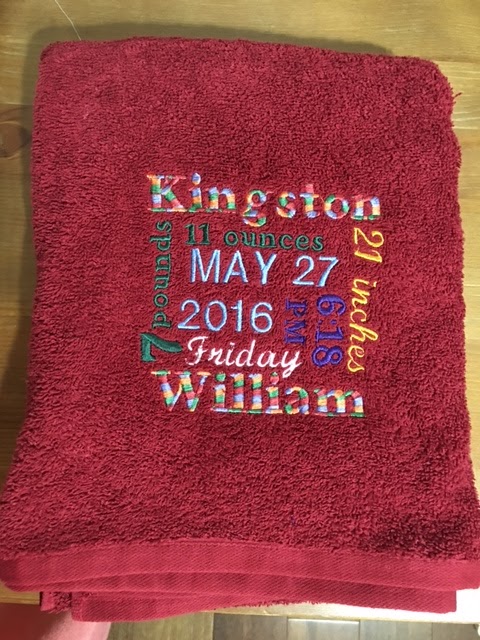
Yet another set with variegated thread.


Usually at the baby shower, I tell the expectant friend about the gift to arrive when I have the details. I need to come up with a card that says this in a better way, with a link to this blog post (haha!).


One of my friends, loved them so much and requested that I make one for her with details of her daughter. You can tell based on the metric system that she does not live in the US:-) 


I love how the other towels in the set are color co-ordinated with the rainbow thread. This is one of my favourite color combinations. I have received all sorts of excited words of appreciation from the recipients. Some of them said that they would  not use them for drying but frame them instead!

I think I should try these on baby blankets, it might be a better gift than towels, something that the kid could use for longer perhaps.

Wednesday, December 14, 2016

Book Review: Quilts With Style


I enjoyed reviewing this book for Fave Quilts  and am glad that I could keep the copy! 

 This is an excellent book by Gudrun Erla who is a fabric designer and an experienced quilt designer.  Although the book contains six quilting patterns there are two completed variations of the quilts shown, the traditional and the modern look, further increasing the number of possibilities for quilt designs are the arrangements of basic blocks in some of the designs.

All the designs have straight edges that make it extremely simple to piece together and yet produce a sophisticated completed quilt. Every pattern in the book has a modern and traditional color variation. Some of the patterns provide variations to convert to a table runner.  Every design provides measurements for the individual block sizes and for the completed quilt size making it easier to plan and choose the appropriate project size.  In addition, detailed instructions are provided for adapting every design to different bed sizes. These are very helpful instructions to avoid running out of fabric while completing the project.

The contrast in the modern and traditional look of the same quilt is dramatic and draws the attention to proper fabric color selection. In addition, the pictures capture the quilting design in the completed quilts and provide ample ideas for finishing the projects.

The Riptide is one of the coolest designs in the book.  Ideas are provided for four additional patterns by using the basic block. There are instructions for using the cut away corners from making this quilt to complete a bonus table runner.  

Just like the Riptide design the Homebound design offers multiple variations of piecing the quilt from the basic block. The simply rectangles design could be used to showcase one of a kind fabrics to make a quilt that could be used as a wall hanging. A young teenager would love to own the modern version of the Simply Rectangles quilt while the Snapshots design would make a great wedding present quilt.

An entire section in the book is devoted to general instructions on completing the quilt. The tips provided in obtaining perfect points when piecing would be helpful to any quilter. Various ways to border the quilt, including techniques to make the binding from fabric are included in this section.

This book will be a great addition to any beginner wanting to take up quilting project.  Experienced quilters will find a lot of inspiration for a new project and will be amazed to see the numerous possibilities with a simple basic block and the differences in modern and traditional variation of the same quilt. 

Read the published review here:

Book Review: Easy Timeless Quilts

I recently wrote a review for this quilting book mailed to be by Fave Quilts.


This book contains seven quilting patterns that are beginner friendly and yet truly timeless.  

These are easy quilts that could be whipped up over a weekend and would make excellent gifts for a loved one. All the designs have straight edges that make it extremely simple to piece together. The patterns provide excellent color combination ideas for choosing the fabrics. Every design provides measurements for the individual block sizes and for the completed quilt size making it easier to plan and choose the appropriate project size.

The Broken Dishes quilt design would be a favorite quilt to make and gift. It seems like a variation of the commonly known Pinwheel quilt design but the choice of fabric colors and the layout make it a truly unique piece. As with all the designs in the book, the basic block can be used to imagine other different creative designs. In the broken dishes design, the basic block is a half square triangle, but the placement of the color schemed blocks gives it a timeless perspective.

Some of the designs in the book like the Plaid Quilt would make a very good gift for a young teenager and could be completed in jiffy. The clever idea of using embroidery floss for tying the quilt could be used to complete any of the quilts in the book. The Friendship Album quilt design can be made for gifting brides and even graduating high-school seniors. It can be used for signing messages with ink or embroidery and makes the quilt even more personal for both the giver and the receiver.

An entire section in the book is devoted to general instructions on completing the quilt. The tips provided in obtaining perfect points when piecing would be helpful to any quilter. Various ways to border the quilt, including techniques to make the binding from fabric are included in this section.

This book will be a great addition to any beginner wanting to take up quilting project and to experienced quilters looking out for inspiration for a new project.


Read the published review here:

http://www.favequilts.com/Books-and-Products/Easy-Timeless-Quilts-Leisure-Arts


Sunday, December 11, 2016

Asterisks Baby Quilt

One of my office mates at work was having a baby shower. I do not work with her in the same team but I got a chance to know her over the duration of working on the social committee. We organized a one day event for the office and there were several committees. We were part of social committee. My office mate is full of enthusiasm and mentioned that she sang in her church choir and hence felt at ease in leading the choir for the event.

Well, over the course of planning the event we shared in her pregnancy journey. When an invite was sent out for a baby shower, I decided to make her a baby quilt instead of donating money towards common gifts.

I had completed this  class from Crafty on  block of the month 2012. It was a free class led by Amy Gibson and I really wanted to try this asterisk pattern. She had two different versions and I opted for the non-wonky version for this quilt.

We knew it was going to be a baby boy so I decided to use blue as one of the main colors. The printed fabric had hearts in blue and yellow and so yellow was also added to the mix and white was an obvious choice to match the printed fabric which also ensured that the quilt did not end up to be a maize and blue quilt representing the Michigan Go Blue colors!

 I love how the arms of the asterisk line up when looking from a distance.

 The binding has all the three colors used for making the asterisks and reads "mummy loves me, daddy loves me, God loves me". It takes time to stitch this on the entire border and in the future I might increase the spacing between the words. The extra detail gives a very good personal touch to the finished quilt.

 I used the stitch in the ditch method for quilting and traced out all the straight lines of the asterisks. If I had more time, I might have tried some of the free motion quilting (FMQ) but did not feel confident enough to try that as yet. That is one of my goals to try FMQ on my sewing machine.


 This picture was taken on the balcony of my apartment and shows my potted herb garden collection!

It was a joy to see the expression of my friends face when she opened the package and everyone in the room gasped. It was fun creating this baby quilt - I enjoyed every part of the process of choosing the fabric, piecing and quilting. I forgot to measure the dimensions of the final completed quilt - should do that in the future for my own reference.


Monday, September 14, 2015

Pouches for all my friends and family!

Some pictures of the pouches I made as gifts for my friends and family on my recent visit to India. 
I love receiving personalized gifts and I guess it goes the same to give unique gifts. One of the first pouches I made was for my brother, Jonathan. I was so happy to see it complete that I forgot to take pictures of it. I wish I did because it was my first pouch gift. My brother says that he loves using it as a toiletry bag. On one of his camping trips he received quite a few remarks on his travel pouch. 

Since then I have made and gifted several personalized pouches but have no pictures to account for most of them. On my trip to India, I decided to gift pouches with embroidered names for each of my friends. I used the built in quilting stitches and decorative stitches in my Janome MC9900.


I made two different pouches for my mother. I love the color combination of this avocado green with the floral fabric. The other other pouch has an embroidered heart, a built in design in the machine, on one side and this amazing fabric with Bible verses on the other side.
I got this Expressions of Faith fabric from Fabrics N Quilts. I love the verse that says "the Lord is my strength and my shield"


This pouch is more like a toiletry bag that I made for my brother Joel - I monogrammed his initials on the back and his name on the front. This was made a pair of retired black jeans. I love how the color combination turned out. I used the bible verse fabric as a lining for the inside.


I love the inbuilt decorative stitches in the machine. I used a different decorative stitch in each of the pouches. The border decorative stitch has a dual purpose - it defines the border and also serves as a quilting stitch in combining the lining and the inner fusible web.


I filled the pouches with assorted candy and all of my friends were thrilled to receive their very own personalized gift. Some of them remarked that this was the first time they received a personalized gift. Seeing their smiles and appreciation paid off all my efforts in getting these done after work.

Quilt for my mother


I bought the fabric for this quilt when I went to the G-Fabric store to redeem my Groupon coupon. I saw this beautiful blue and white fabric with crabs all over it and thought of Cancer the zodiac sign that my mother shares. I bought a yard of the fabric, without a definite quilting pattern planned in my mind at that time but felt inspired to buy the fabric.

It was nearly a month later when on my mom's birthday on July 2nd, I decided that I had to begin a quilt as a birthday gift. The idea was to gift the present when I actually meet her in person, someday. I loved these pictures of the economy block with a 9 patch block in the center that saw on Bryan House Quilts. I had saved this as a possible future quilt idea on my Pinterest account. And so on her b'day I began cutting out 3" strips to make a 3X3 square block. I enjoyed making the 9 patch blocks. It was a delight to find them line up and square up perfectly - this would be one of the many moments of delight to follow.

I knew that the quilt could be personalized even more. I decided to embroider the names of all the four kids in one of the blocks. I decided to also embroider words describing my mom on the border. I emailed my siblings and asked them to send in their messages. List of words on the border included - tenacious, loving, caring, inspiring, master chef, bold, faithful, cheerful, smart, classy, wonderful, nurturing,nutty, wise, thoughtful, creative, compassionate, beautiful, brave, strong, kind, classy, dynamic, selfless, friend, comforter, intelligent, teacher, patient and mother. I alternated the fonts between upper and lower case to draw the eye to the different words and make it appear less monotonous. 

I used an easy out and bought a queen set that came with a cover and fitted sheet and pillow covers. The idea was to use the cover sheet as the backing for the quilt. This idea served a dual purpose - my mom could now use a matching set on the bed when using her quilt! 

For the backing I used this warm and natural batting that I found on Amazon - made of natural cotton fibers, ideal for using the quilt in India. I also got a good deal on the price, there was a half price off sale going on Amazon and the timing was perfect!

During the process of making the quilt, I planned a trip to see my ailing grandmother in August. This unscheduled trip forced me to work in a frenzy after work every evening to complete the quilt. This also meant that I had to forgo my plans of free motion quilting and stick to something more basic and quick. And so straight stitch in the ditch it was!

It was a delight to see my mom's face when she received her present. It was worth all the time and effort put in creating this quilt. My mother was very impressed by the finished product. I used to recite many prayers and blessings for my mother when working on the quilt. I am sure my mother will fill the warmth of the love and be uplifted by the blessings in quilt when she tucks herself to bed every night.

This quilt is the first of the many to follow for the rest of my family. I intend to complete one for my father and my siblings. My siblings might most probably receive theirs on some momentous occasion. For now I am trying to decide on a pattern suitable for my dad. I love the double wedding ring pattern however am not feeling confident of undertaking the challenge as yet!
My next quilt will have free motion quilting - I know that I want to try this out. 

In the meantime, any suggestions for a male/man quilt pattern are welcome!


Check out the perfect points in the piecing!


Friday, April 17, 2015

Sewing Tools


I bought my Janome sewing machine only this year in January. I will write another post explaining my sewing machine and how and why I decided to buy this particular sewing machine.

When I finally bought the sewing machine, I wanted to begin sewing immediately, that is just my nature to get into the thick of things and begin working. I had been reading up some blog posts about quilting and knew that I wanted to try some quilting before venturing out into sewing garments.

So my first set of tools that I bought included this friskars cutting mat set. The set included an extra large mat, a clear acrylic ruler and a rotary cutter all for a discounted price of $27, originally priced at $55. It seems like the set is still on sale on amazon. Using the cutting mat at first seemed very alien and on reading experiences from other crafters in the community is seems that this is not unusual. I watched a couple of videos and figured out the techniques in using the cutting mat and the acrylic rules and the rotary cutter to cut fabric. All the three items in the set are needed to cut fabric for the purposes of quilting. The rotary cutter slides along the ruler and gives clean edges.I am sure the mat and the rotary cutter could be used for cutting other materials like paper and leather too.

Although I did purchase these friskars scissors too, the rotary cutter is a big step up from using scissors to cut fabric. It totally revolutionizes the process of cutting fabric precisely for purposes of making quilts. The rotary cutter, with its super sharp blade made it extremely easy to cut through nine layers of fabric, something that I had to do my first nine patch quilt. I would exercise extreme caution while using the rotary cutter, so far I have not had any accidents but have read of several mishaps. I use my rotary cutter only for fabrics just so that I do not dull the blades, just like keeping a separate pair of scissors only for fabric.

I love using my cutting mat, the grid lines make it convenient to align fabric correctly and precisely before cutting. Both the surfaces of the cutting mat have grid lines and could be used to cut fabric. I used the cutting mat to iron my pieces once, only to realize that the mat does not behave well with heat. Thankfully the slight warping was not permanent and the board regained its original structure when cooled. Henceforth no heated surfaces come in contact with my board. I also store the board flat so that it does not bend or fold.

I am very pleased with my first purchase, I feel it was money well spent and would recommend this super value for money deal to anyone thinking of doing some serious crafting.

I have a whole list of other quilting tools to buy, like these rulers that would make it so much easier to cut squares. I would love to hear about your experiences using rulers and which are your "must-haves" for quilting.